Internet Connection Settings (wireless connection)
This setting is available only on PS3™ systems that are equipped with the wireless LAN feature.
Set the method for connecting the system to the Internet. Internet connection settings vary depending on the network environment and the devices in use. The following procedure describes a typical setup when connecting to the Internet wirelessly.
1. |
Check that the settings for the access point have been completed.
Check that there is an access point connected to a network with Internet service near the system. Settings for the access point are typically set using a PC. For details, contact the person who set up or maintains the access point.
|
2. |
Confirm that an Ethernet cable is not connected to the PS3™ system.
|
3. |
Select  (Settings) > (Settings) >  (Network Settings). (Network Settings).
|
4. |
Select [Internet Connection Settings].
Select [Yes] when a confirmation screen is displayed stating that you will be disconnected from the Internet.
|
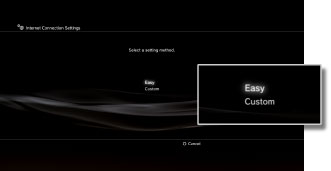
5. |
Select [Easy].
|
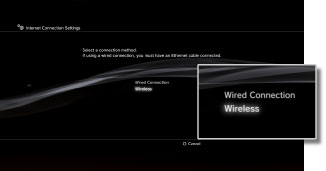
6. |
Select [Wireless].
|
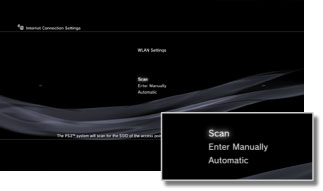
7. |
Select [Scan].
A list of access points within the range of the PS3™ system is displayed.
Depending on the model of PS3™ system in use, you may have the option [Automatic]. Select [Automatic] when using an access point that supports automatic setup. If you follow the on-screen instructions, the necessary settings will be completed automatically. For information on access points that support automatic setup, contact your local retailer.
|
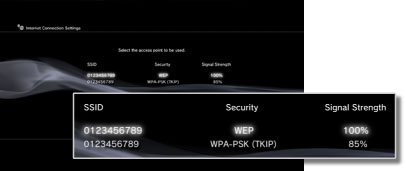
8. |
Select the access point that you want to use.
An "SSID" is an identification name assigned to an access point. If you do not know which SSID you should use or if an SSID is not displayed, contact the person who set up or maintains the access point for assistance.
|
9. |
Check the SSID for the access point.
|
10. |
Select the security settings that you want to use.
The types of security settings vary depending on the access point. Contact the person who set up or maintains the access point for information on which setting to select.

|
11. |
Enter the encryption key.
The encryption key is displayed as a series of [*]. If you do not know the encryption key, contact the person who set up or maintains the access point for assistance.

When you have finished entering the encryption key and have confirmed the network configuration, a list of settings will be displayed.
Depending on the network environment, additional settings for PPPoE, proxy server or IP address may be required. For details on these settings, refer to the information from your Internet service provider or the instructions supplied with the network device.
|
12. |
Save your settings.
|
13. |
Test the connection.
If you select [Test Connection], the system will attempt to connect to the Internet.
|
14. |
Confirm the connection test results.
If a successful connection has been made, information on the network will be displayed.
|
Hints
- If the connection fails, follow the on-screen instructions to check your settings. Also refer to the information from your Internet service provider and the instructions supplied with the network device in use.
- If you test the connection immediately after selecting [Automatic] > [AOSS™] in step 7, the router settings may not be completed and the connection may fail. Wait approximately 1 or 2 minutes before testing the connection.
